Monday, February 28, 2011

Hazzard County Card Challenge

Oh my, the other Hazzard County girls are going to be so surprised when they see I have joined in this months challenge.

Let's say I killed two birds with one stone.  Saturday I went to a Megameeting (for demonstrators) in Burlington with Kathy and we had a great time.   It has been a few months since I joined in any swaps, so when I saw Jacqueline Cameron was hosting a Sale-A-Bration Mini and an Occasions Mini swap I joined both. 

Each swap had to use products from their respective Mini Catalogue so for the Occasions Mini I decided to use Create-a-Cupcake.  Well wouldn't you know it but I incorporated the elements required for the HCCC challenge this month.  PERFECT! LOL

My cupcake has the most detail but still came together quickly.  I punched out a piece of Real Red cardstock using the 2 3/8" Scallop Circle punch, I cut out a Baja Breeze circle (2 1/4") using the Circle Scissor Plus and then a Whisper White Circle (2") using the Circle Scissor plus.  I layered these three together.

Next I punched out my cupcake top from Baja Breeze cardstock using the Create-a-Cupcake punch.  I covered the piece in Tombow Multipurpose Glue and covered with Baja Breeze Glass Glitter (soooo pretty).


The cupcake bottom was made by inked up (using a marker) in Pear Pizzaz ink from the Create-a-Cupcake stamp set and stamped on Pear Pizzaz cardstock.  I used the punch to then punch it out.  I glued this to the White cardstock circle.  I also added Tombow double sided adhesive to my glittery cupcake top and added that to the white circle as well.  Then using the oh so bold Red Glitter paper from the Occasions Mini I punched out my cherry and used a glue dot to hold that in place.


Next I ran a piece of Whisper White cardstock through the Big Shot using the Elegant Lines embossing folder.  I wrapped Pear Pizzaz seam binding (also from the Occasions Mini) around and tied in a bow.  Wow is this stuff shimmery and light, you can barely feel it between your fingers.  I can't believe how gorgeous it is though and can't wait to order more.

I added my White embossed layer to my 4 1/4" x 5 1/2" Real Red card base and finally popped up my layers of circles and cupcake to the front of my card.

I love the bold bright colours of this card and how yummy that cupcake is.

Friday, February 25, 2011

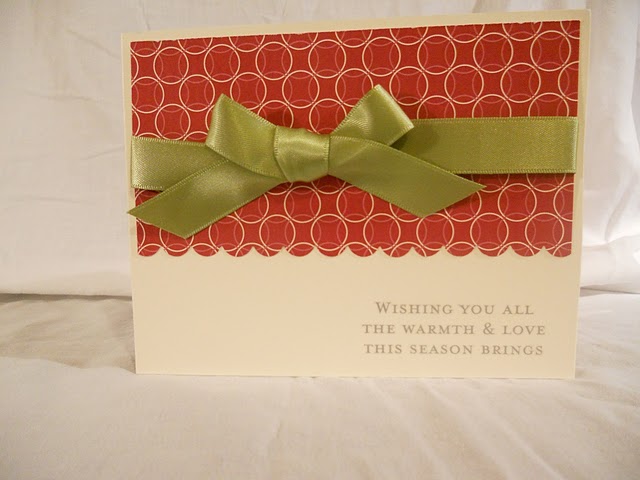
Warmth and Love

How about a quick and simple card for a Friday?  I need to do quick and simple because I have a cold and it is dragging me down. 


The base is Very Vanilla with a bit of Jolly Holiday designer paper layered over top.  One edge of the Jolly Holiday paper is punched with the Scallop border punch.  Before I attached this to my base though I wrapped my Old Olive Satin ribbon around it and tied it in a bow.

The sentiment is another Merry & Bright silver rub-on. (retired)

Thursday, February 24, 2011

Dry Heat is So Sweet

I was teaching a card class last week and wanted to showcase both dry and heat embossing all on the same card.  I wanted my image to really stand out so we used Versamark and then black embossing powder.  The flowers were then coloured in using Stampin' Write Markers. 


I wanted to also show how you can dress up the inside of the card so we repeated the process on Whisper White cardstock for the inside flap.


They loved this card and how easy it is to do both heat and dry embossing.

Wednesday, February 23, 2011

Whoo's Anniversary?

I love the new Sale-A-Bration set, Punch Bunch.  It has so many simple and sweet images and sentiments and the cute little owl used on this card is no exception.  The really wonderful thing about this is that once the owl is stamped, you simply use the 2-step Owl punch to punch them out.

I wanted a bright and vibrant card with texture and the owls seemed a great fit.  Don't you love that one has a green 'belly' and the other a 'pink' belly?  So easy to do with markers.


I also learned that using the bone folder to curl even small strips of paper works great to add depth and appeal to a card, so that is what I did with my little sentiment.

To earn your free Sale-A-Bration set(s), contact me today at margaret@stamphaven.ca   (Canadian residents only please)

Tuesday, February 22, 2011

Nature's Smile

Tuesday already?  That long weekend sure flew by and now we are back to work.  C'est la vie!

Since I have had so many classes over the past few weeks I do have some new card creations to share with you as soon as I photograph them but for right now I will share an old card with you.


The layout and colours are quite simple yet I love the saying and the simple effect that paper piecing can create.  Oh and don't forget a bit of glitter to glam up those lovely flowers. :)

Friday, February 18, 2011

Blog Award

Wow, it has been a long time since I have been blessed with a blog award.  I was delighted when I received a note from Suze Bain who's blog I discovered while participating in the Less is More blog challenge and I am thrilled to accept this award.


These are the conditions of accepting the award:


1) You have been tagged, do you want to accept? YES! then create a post on your blog and post the love blog photo.

2) Link back to the person who gave you the award and say if you accept.

3) Choose 3-5 of your favourite blogs to tag, link these in your post too and tell the lucky people they have been tagged. As the aim of this award is to bring unknown good blogs to light, please don't tag somebody with 3000 followers.

So these are the blogs that I would like to pass on the award to (please pay them a visit - all have less than 20 followers)

Angela - http://angelasscrapyard.blogspot.com/
Melissa - http://laymans-views.blogspot.com/
Marnie - http://marniverse.blogspot.com/

Red and Silver Ornament

Shortly after Christmas I was speaking with my dear friend Angela who had been the recipient of today's card and she had a sweet little story for me about the card.  She will have to correct me if I get the details wrong but it was something along the line of the card being the perfect card for them.  It arrived in the mail and the kids sat and played with it for about 15 minutes pretending they were selling ornaments and showing off the different colour choices to select from.  (I hope that was right Ange ;~)


This card was so pretty and with the extra popping of the ornament and the pearls to give it a soft touch it turned out just right.

Thursday, February 17, 2011

A CELEBRATION!!!

My blog hit count has hit 10,000 - WOO HOO!!!

2 years and 10 days and I finally hit it.

Okay I know lots of blogs get that in only a few months but hey I just haven't been discovered yet by the world.  LOL

I need to decide how to celebrate.  I'll get back to you on this.

Have a great evening and thanks to all those who visit me regularly and have helped me reach this milestone.
Margaret :)

Less Is More

Lately I have been browsing around some new blogs and I found one called Less Is More that has challenges focusing on simpler cards.  Well wouldn't you know it, their challenge this week was a one layer card with the theme of a flower or a tree and I just so happened to have a one layer card with a tree on it ready and waiting for me to photograph and post.

It was meant to be.   So todays card is another one of my sponged spotlight cards that I have grown to love because of how simple yet effective this technique it.


I used Wild Wasabi and Marina Mist ink to sponge my landscape and I used the tree from the set Forest Friends.

I hope you like my simple yet vibrant card and would love for you to give this technique a try as well.

Wednesday, February 16, 2011

Shaving Cream Fun

Oh my goodness... here is a card we made at a meeting at my former up-line's home.  Who knew that shaving cream could create this fantastic look? I seriously love it and yet, I have never tried it on my own since, but I will be soon. 

This card was so simple yet packs so much WOW.  First you follow the shaving cream technique on Whisper White cardstock, next stamp your image, then cut it out with the paper trimmer and trim cut out down a bit more so when you place it back in it's opening there is a mat around your image.


This will be one of the techniques we will be doing at my workshop on Monday February 28 at 7:30pm.  If you are in and around Fergus, Ontario and would like to attend my free workshop please feel free to contact me and reserve your spot.

Tuesday, February 15, 2011

Peace on Earth - Christmas Card of the Week

Well I am trying to get back to posting one Christmas card a week. 

Today's is a card that I, for the most part, CASE'd from Renee V at Stampin' For Sanity (her post was back in December)


I love the soft colours and that the card is not too busy with embellishments.

Monday, February 14, 2011

To My Sweet Valentine

For those of you who know me you likely know that I am truly, madly, deeply in love with my better half, my fiance, Chris.  Although I may moan and complain every so often, he really is good to me.  He respects me, cares for me, adores me and although his disability prevents him from doing a lot, those things he does do, mean so much.  I am a poor cook but that's okay because he does the majority of cooking, even though it may take him several hours.  Now how can you say that isn't love.

Our life together has changed dramatically since Chris' accident but we slowly are learning to make the most of what we can do together and just enjoy each other.

I tell you, since I have moved my stamp room he has barely seen me and yet he has been so supportive and encouraging.

I just had to make a special card for him, so after all my absolute must -do's were completed on my To Do list, I sat down and made this sweet creation for him.  I was inspired by my dear friend Melissa's card to her husband John.

I left it on the bedside table this morning for him when I left for work so that when he gets up he will see it (I hope LOL)

This 6 x 6 card was super easy to make and this was the first time I sponged clouds onto a card.  I have been really into sponging lately and so I got my fill creating my sky on this card.


The only stamp I used was the sentiment and it is from Artistic Etchings.  I really had to hold myself back from using ribbon on this card and I think the Pewter Hodgepodge frame was just right. 

I really didn't want to lose the ever classic colour of Valentines and therefore made sure I included red in this card.   I really like these colours together.  One thing I love about this card is that after sponging on the textured Vanilla cardstock, it now has the look of fabric/ linen. So cool!

Wishing you all a Happy Valentine's Day!