Tuesday, March 31, 2009

Easter Treats


Okay so perhaps this is only slightly on the Easter side. I apparently don't own any 'Easter' sets or any sentiments with an Easter saying. Wow!

So I really had to think hard on what I could make that still worked for Easter. These items are what I came up with. I made the sour cream container using a piece of 6 x 6 DP from the Sale-A-Bration paper. I stamped the sentiment using the Oval All set from the Occasions mini beginning tomorrow and punched it out using the matching Oval Scallop punch, also from our upcoming Occasions mini. The ends are crimped to seal it well and to add some texture.

The little pail is from the dollar store (set of 3 for $1) and we used the sale-a-bration DP again. We stamped the birdie from the Best Wishes set in Pacific Point ink. Using the vanilla hodgepodge hardware, I worked vanilla 5/8" grosgrain ribbon through and around the pail and tied in a knot.

Last but not least is the card. I so took this card from our demo Stampin' Success magazine from March I do believe. At first you think its an ordinary card, until you raise the top half and voila, there is a sentiment in behind. I used So Saffron and Certainly Celery for the card front and scalloped the top edge of the Celery CS. I attached the two halves using a brad only and adhered only the 3 lower sides of the Celery to my Kraft CS card front. This allows the So Saffron CS to pivot up. I stamped the bird and flower using my Fast & Fun Notes set and coloured him in using my reinkers and a blender pen. I used my scissors to distress the edges and layered him on Regal Rose CS and wrapped Regal Rose around my So Saffron CS front. I popped the bird image above the ribbon and stamped my sentiment on the Kraft CS and this oh so simple card is complete.

Monday, March 30, 2009

Soft and Sweet


So I got together with some other demos on the weekend for a play date and we did a shoebox swap. Talk about inspiration when we get together. We could go on for hours and hours if it weren't for the fact that we all have life outside of stamping.

I made this card for our little shoebox swap. I chose to do a multilayer card without being crazy busy. The card is 5" x 5" and the base is Textured Pink Pirouette CS. I used the Pink Pirouette DP pack along with smooth Pink Pirouette CS, Pretty in Pink CS and Whisper White CS for my layers. I paper pierced on the top two layers as I figured it would be too much work to drag my 100lb 100 year old sewing machine with me (okay so thats a slight exaggeration) but it is heavy and it is old. LOL I wrapped Regal Rose 1/4" grosgrain ribbon around the 3 layers under the tag.

I stamped the long flowers from Simply Said on the top white piece of cardstock and softened the edges by sponging ink around the border. I used my Lots of Tags Sizzlits with Regal Rose CS and Whisper White CS for my sentiment which is also from the Simply Said Set. I stamped my sentiment in Regal Rose ink to make it stand out more. I felt the card needed one last touch, so I cut out my bird in Pink Pirouette textured CS using the Birds & Blooms Sizzlits.

Wednesday, March 25, 2009

Sweet Bella


I absolutely love this fold design. I got it from the Splitcoaststampers resources Joy Fold Card. I so CASE'd this card. I'm not known to do this as I like to be creative and make my own thing but I fell in love with the way this card folds AND I love the Sweet Bella DP from SU!

The only thing I did different on this card is the images I stamped. I stamped the images using A Rose is a Rose. This was one of the projects at my Open House back in September of last year. That's right, I didn't have time to play last night so nothing new that I can post today. (I worked on making projects for my Stampers 10 group Friday night - I'll post them after the weekend.

Tuesday, March 24, 2009

Sheer Class


I used Mojo Monday's Sketch 79 for my layout today. I was running short of time last night making this card as I was finishing up a wedding invitation order, so I decided to bypass making a card that needed colouring.

My mom's birthday was yesterday and yes, I know, I am behind on giving her a card, so I am going to give this card to her. I think the card is very classy, elegant and yet simple.

I used Whisper White for my base and have layered gold CS over top. I used basic black for my second and third layer bases. On the top layer I used the FABULOUS new paper from the Taste of Textiles cardstock package from SU! I am so in love with this paper, it is so gorgeous. I stamped the image from the Ever After set (SU!) in versamark and covered in gold EP and heat set. I paper pierced around the second layer and then I adhered my top layers together and wrapped satin ribbon from Supreme Laces around the card. I added some clear Robins Nest Dew Drops for added appeal. I then stamped the sentiment from the Hugs & Wishes set (SU!) in versamark and once again added gold EP and heat set.
I hope my mom likes this card and (shhhhh - I'm whispering now) forgives me for being late. LOL

Monday, March 23, 2009

Wild Horses


I find I rarely make cards that are suitable for guys. I'm always trying to make frilly, girly cards and then I forget that there are men around me who appreciate handmade cards.


This card was stamped with the Wanted set and I kept it very basic. I used Chocolate Chip as my base and used some retired western themed DP over top. To give my card movement, I stamped my horse image 3 times by stamping off to acheive the lighter images and then progressively making the horse darker. I layered the image on Really Rust CS and stamped out the bull head image using my scallop circle punch and layering on a piece of Really Rust CS also punched out with the scallop circle. I raised this image up with dimensionals as a final touch.

Friday, March 20, 2009

London Regional Cards


Last week Saturday I went to the Stampin' Up! Regionals in London.
What a blast! All those fellow demonstrators, the WOW presentations, the ideas. My head is still reeling and its been a week. LOL
I can't wait to share ideas I learned with my customers and friends.
I was so excited that I actually didn't make all my projects.
I decided I would make the cards that I didn't have all the items for at home.
So I did make 3 projects and I have 3 more to complete.


Here are two of the items we made while at Regionals.

Wednesday, March 18, 2009

Who's That Little Birdie In the Window


Ahhh yes, I do amuse myself at times. I thought of what I should title this card and this song immediately popped in my head.

So on Saturday I went to Stampin' Up! Regionals in London and I must say I had a fab time. I always get pumped up when I go to one of these events and I learn fantastic things to share with others.

Now I have been lax over the past few years when it comes to swaps at events I attend but I decided rather last minute that I would make some swap cards for Regionals. I had a shipment of supplies arrive Thursday and BAM I had inspiration. The card seemed to come together without much effort at all. Honestly I was quite surprised because I can agonize for hours over a design and still be unhappy with it in the end.

I made this card in two colours. The first was Brocade Blue and the second was Regal Rose.

I first stamped my grass from the Inspired by Nature set in Kiwi Kiss ink on my Whisper White CS. I placed a scrap piece of paper along the bottom of my white CS so that the grass stayed in the area where I wanted to place my "window". I then used my new oval scallop frame in the Big Shot to cut out my "window" in Brocade Blue and Regal Rose. I placed three brads along the right side from my Rich Regals brad set. I tied 5/8" grosgrain ribbon along the left side and popped my window up on my card using dimensionals.

I then used my bird die, from the Birds & Blooms sizzlit set, in the Big Shot. I set the bird in the grass and attached a wing to make him look like he was flying through the grass.

I finished my card by stamping Warm Wishes from the Hugs & Wishes set.

Monday, March 16, 2009

Enjoy Every Moment


I made this card a few months ago for one of the SU! monthly demo contests. It was to use chipboard letters on a project.


You will have to pardon my poor picture quality. I have been working on my photography skills when it comes to taking pics of my projects. I used Chocolate Chip CS and Certainly Celery CS for my base colours. To keep my white space not so in your face, I used Natural Ivory CS instead of the Whisper White.


I used my Enjoy stamp set with Certainly Celery and Chocolate Chip Clasic Ink. On the chipboard E, I used my Green bead duo set beginning with the large beads and filling in the spaces with the micro beads. I attached some Chocolate Chip Taffeta ribbon to finish it off.

Friday, March 13, 2009

Stamp - Imagine


My little inspiration reminder. That's what my Stamp Imagine frame is for me. I made this a couple years ago when the whole name frame craze was going on.

Most of the products I used to make this frame are already retired and I'll be quite honest I can't quite remember all the names of all the products I used to make this. What I do know is that they are all SU! products.

I keep this in my stamp room where I can always see it. If you have any questions about how I made this don't hesitate to ask.

Monday, March 9, 2009

Emergency Tins

I purchased a bunch of 'altoid' tins a few years ago and onto a shelf they went. I could say that about so many things I own. Tsk tsk. I pulled them out a couple weeks ago and decided to make something with them.
We all have little emergencies while we are out and about and although we may carry these items in our purses, we usually have to dig around before we can find what we are looking for. So I made this emergency tin which can hold all the small things, like band-aids, wet wipes and safety pins.
I used the level 1 hostess DP paper pack along with Chocolate Chip CS for my base layers. I printed out emerg on the printer and 'distressed' the edges with the appropriate colour ink to match my DP.
I finally caved and ordered the Vanilla Hodgepodge Hardware from SU! and used this as a frame for my E which I stamped using the Jumbo Outline Alphabet from SU! I also used Felt Flower Fusion and Fresh Favorite buttons from SU! to add some eye candy.

In the opening of the tin, I punched two holes along the inside lip with my Crop-A-Dile and tied my ribbon inside to form a little handle.


Monday, March 2, 2009

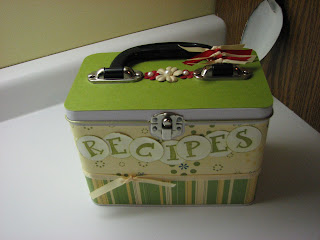
Recipe Tin


This was my first paper covered lunch tin. I had made a few using chipboard and embellishments only but I finally got up enough courage to do a cardstock covered tin. I love the fresh vibrant colours of the cardstock, mind you I can't remember what the name of the DP pack it was from. I used Vanilla ribbon to wrap around the tin and Vanilla and Real Red grosgrain ribbon to tie around the handle. I found this gave a nice break to the black handle. I used Prima Flowers and Half Pearls from our Pretties Kit on the top of the lunch tin for decoration and to be quite honest, to cover the cut in the cardstock to get the paper around the handle. LOL Sneaky, I know. I used the retired alphabet set - Upper Alphabet Fun for stamping out the word Recipes and punched them out using the 1 3/8" circle punch. I then used my Old Olive ink and applied to the edges of the punched out letters to add a bit of a distressed look.

What is a recipe tin without recipes, right? And to keep those recipes organized you need dividers with a label so you know which section to look in, right? So I stamped the image using the retired set, Recipe Fun, and used my watercolour pencils to add some colour to them. I then stamped the images out using the 1 1/4" circle punch and layered on a pc of old olive that I punched out using the Scallop Circle punch. I attached them to a pc of cardstock and there you have some easy dividers. I am not sure why the pic rotates when I load it but I was unable to fool it into loading the way it is on my system. Weird eh?